How to Make a Pumpkin Flower Planter Without Ruining Your Mums
Immediate answer: A real pumpkin can serve as a temporary decorative planter for a potted chrysanthemum. Choose a healthy pumpkin with a wide, stable base, safely remove the top, scoop out the seeds and pulp, and fit a flowering mum inside while keeping its draining nursery pot intact. For watering, remove the nursery pot from the pumpkin, water the mum’s soil, allow excess water to drain and return the pot. Do not leave it in trapped standing water. The pumpkin naturally decomposes—replace the shell when it starts softening or breaking down.
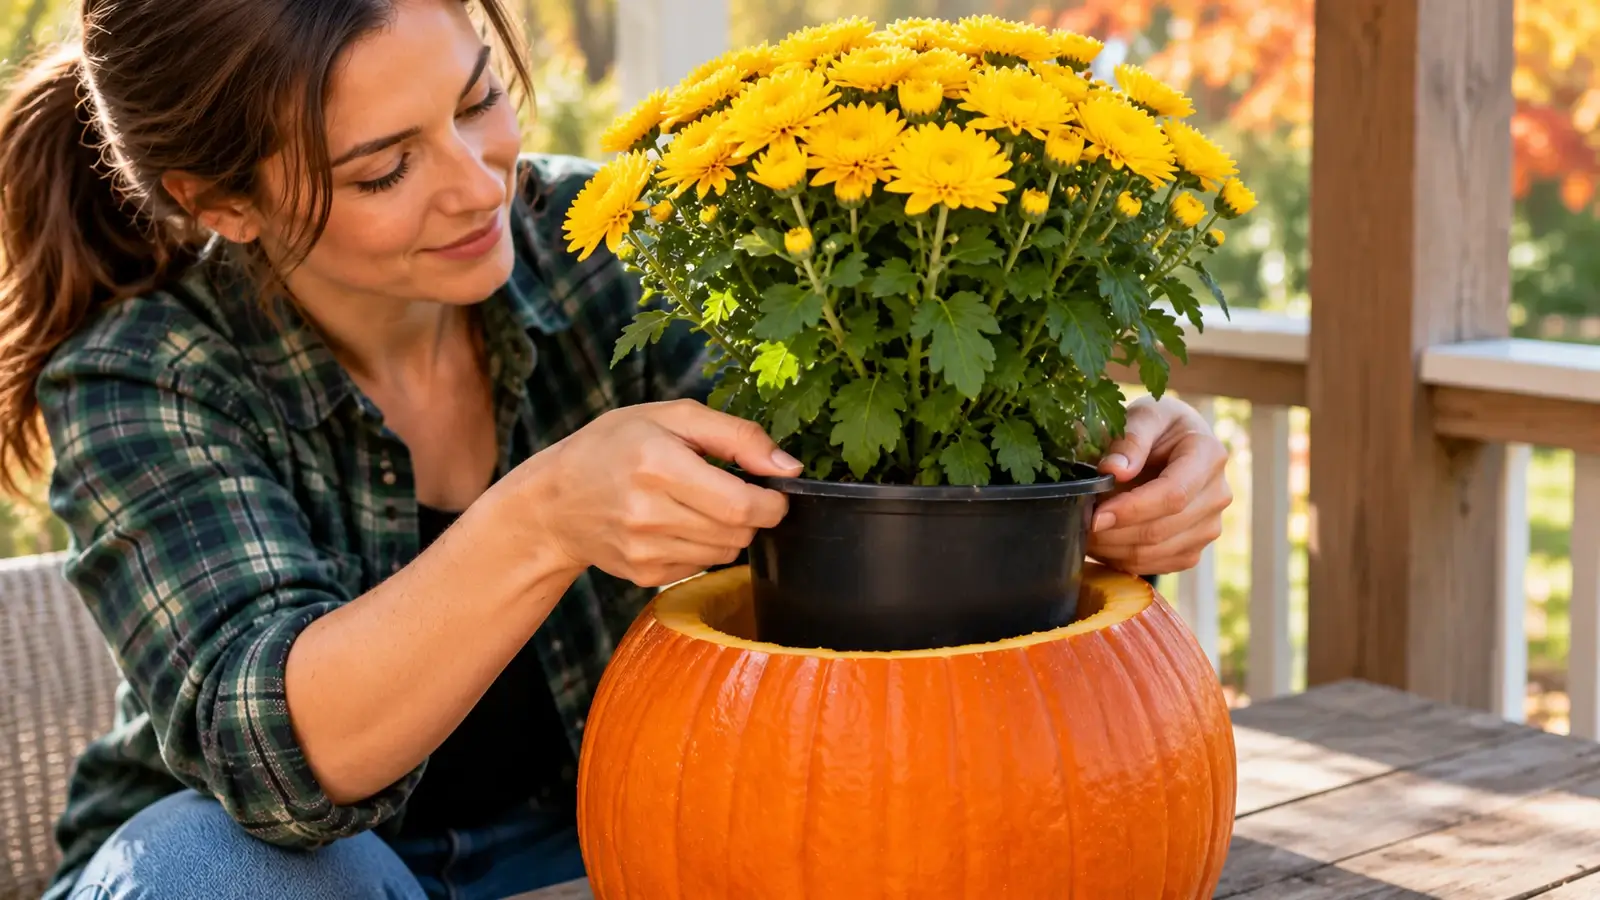
1. Can You Use a Real Pumpkin as a Planter?
Yes—a hollowed real pumpkin makes an eye-catching autumn porch display for a potted fall mum, provided you treat the pumpkin as a temporary decorative outer cover (cachepot) rather than a permanent sealed pot. Garden chrysanthemums need consistent root moisture, working drainage, and bright light (University of Illinois Extension; Mississippi State University Extension; Costa Farms).
When you keep the mum inside its original plastic nursery pot with drainage holes, you can lift the plant out to water and drain freely, keeping both the root ball aerated and the inside of the pumpkin shell much drier. If you instead dump loose soil and water into an unpierced pumpkin—or water a potted mum while it sits trapped inside an undrained gourd—water pools at the base, suffocating the mum’s roots and accelerating soft rot in the pumpkin floor (Garden Gate Magazine; Thrive).
2. What You Need
Gather these supplies before cutting into your pumpkin so you can size the opening accurately:
- One healthy, flat-bottomed real pumpkin sized slightly wider and taller than your mum’s nursery pot
- One potted fall chrysanthemum (garden mum) in its original plastic nursery pot with working bottom drainage holes
- A washable marker or grease pencil for tracing the nursery pot’s rim onto the top of the pumpkin
- A sturdy carving knife or small serrated pumpkin saw (for adult use on a stable work surface)
- A large metal kitchen spoon, ice-cream scoop, or wide pumpkin scoop to remove seeds and stringy pulp
- A tray, bowl, or newspaper to collect scooped seeds and fibers for roasting or composting
- A protective saucer, trivet, or outdoor porch mat to place under the pumpkin if it rests on painted wood, composite decking, or stone
3. Choose the Right Pumpkin and Mum
Measure the nursery pot first: Before picking a pumpkin, measure the outer diameter and height of your mum’s plastic nursery container (commonly 6-inch, 8-inch, or 9-inch pots). Look for a medium-to-large carving or heirloom pumpkin whose shoulder is at least 3 to 4 inches wider than the nursery pot so the shell walls remain thick after hollowing. Set the pumpkin on a flat table or floor before buying to verify that it sits level without rocking, and inspect the rind—especially the bottom—to make sure there are no soft spots, cracks, or weeping bruises.
Select a long-lasting garden chrysanthemum: Fall mums sold at garden centers are garden chrysanthemums (Chrysanthemum cultivars). For the longest porch display, University of Illinois Extension and Mississippi State University Extension recommend choosing a compact, well-branched plant covered in tight or just-cracking buds showing a hint of color rather than a plant whose flowers are already fully open. Look for crisp, dark-green foliage down into the canopy and avoid root-bound pots with wilted or yellowing lower leaves.
4. Prepare the Pumpkin Safely
Follow an adult-oriented, steady cutting and scooping process:
-
1.
Stabilize the pumpkin and trace the opening
Set the pumpkin on a non-slip cutting board or folded towel. Hold the mum’s nursery pot above the stem (or trace a cardboard template matching the pot’s upper width) and draw a circle around the top shoulder. Wipe away any marker line afterward.
-
2.
Cut the top lid with controlled strokes
Using a sturdy serrated pumpkin saw or short, rigid carving knife, cut slowly along your line with the blade angled slightly inward or straight down, always cutting away from your stabilizing hand. Lift off the stem cap and trim away stringy pulp attached to it.
-
3.
Scoop out seeds and loose fibers while keeping a 1 to 1.5 inch wall
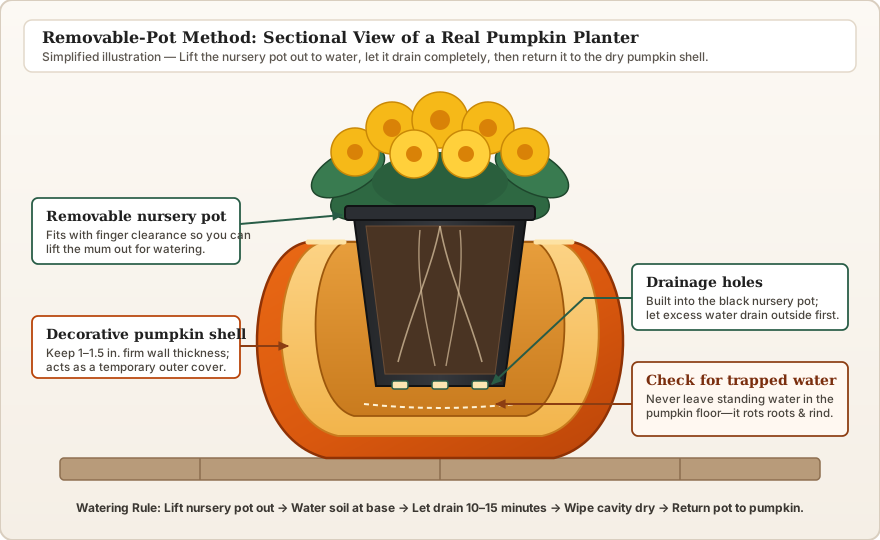
Use a heavy metal kitchen spoon or wide pumpkin scoop to scrape away the seeds and loose, wet stringy strands until the inner cavity is clean. Do not scrape the walls paper-thin: leave roughly 1 to 1.5 inches of firm flesh along the sides and bottom so the shell stays rigid enough to support the weight of a watered mum pot.
Note on chemical preservation hacks: You do not need to soak the pumpkin in bleach solutions, spray fungicides, or coat the interior with petroleum jelly—especially when keeping the mum in a removable nursery pot or composting the pumpkin shell afterward. Keeping the interior clean, dry, and out of standing water is the most practical way to slow premature softening.
5. Insert the Nursery Pot
Keep the chrysanthemum’s root ball inside its original draining plastic nursery pot (Costa Farms; Garden Gate Magazine). Test-fit the nursery pot into the hollow pumpkin:
- Check rim height and finger clearance: Ideally, the top rim of the plastic nursery pot sits flush with or just below the cut pumpkin rim so the mum’s mounded foliage conceals the plastic edge, while still leaving enough room to slip your fingers around the rim and lift the pot out.
- Adjust depth without thinning the pumpkin floor: If the nursery pot sits slightly too low inside a deep pumpkin, place an inverted plastic saucer or a small flat plastic riser on the bottom of the cavity rather than scraping the pumpkin floor thinner.
- Never force or wedge the pot: If the plastic pot binds against the cut opening, lift the pot out and pare away a thin bevel of pumpkin flesh around the inner rim. Forcing a tight pot splits the pumpkin wall and makes lift-out watering difficult.
6. The Important Drainage Rule
The single most important rule for a healthy pumpkin mum planter is to never leave the nursery pot sitting in trapped water inside the pumpkin shell:
- Lift the nursery pot out of the pumpkin whenever the mum needs water.
- Water the potting mix thoroughly at the base of the stems until excess water flows freely from the nursery pot’s bottom drainage holes.
- Let the pot drain completely for 10 to 15 minutes on a porch step, sink, or driveway.
- Wipe or pour out any moisture inside the pumpkin cavity, then set the drained nursery pot back into the pumpkin.
Why standing water ruins both the plant and the pumpkin: Chrysanthemum roots require oxygen in the pore spaces of their potting medium; sitting in stagnant water starves roots of oxygen and encourages root rot (Illinois Extension; MSU Extension). At the same time, water pooling against cut interior pumpkin flesh turns the bottom of the gourd mushy and foul-smelling within days.
7. Light and Watering
Balancing what the living chrysanthemum needs with what keeps a cut pumpkin fresh requires understanding a simple autumn tradeoff:
- Sunlight vs. pumpkin warmth tradeoff: Garden chrysanthemums perform and open buds best with at least 6 hours of sunlight daily (Illinois Extension; Mississippi State University Extension). Do not banish a mum to a dark, sunless corner just to preserve the pumpkin—deep shade causes tight flower buds to stall and foliage to weaken. However, hot afternoon sun beating on a heat-retaining stone step can warm the cut pumpkin shell and speed up softening. An ideal compromise is a bright, airy porch location that receives morning and midday sun with light shelter from intense late-afternoon heat and heavy rain.
- Check actual soil moisture before watering: Dense mum canopies act like an umbrella that sheds light rain, while small nursery pots packed with roots can dry out quickly on breezy autumn days (Illinois Extension). Press your finger 1 inch into the potting mix every day or two: when the top inch feels dry to the touch, lift the nursery pot out and water thoroughly until it drains. Do not wait until leaves droop severely.
- Water at the soil line, not over the flowers: Part the lower foliage gently or lift the pot out and direct water onto the potting mix rather than drenching the dense dome of blooms (MSU Extension; Costa Farms). Keeping flowers and inner foliage dry helps blooms last longer and keeps water from running down the outside of the pot into the pumpkin cavity.
8. How Long Will the Pumpkin Last?
Once a real pumpkin is cut open, it is a perishable fruit whose lifespan depends on local weather and care—no honest guide can guarantee an exact number of days. A cut pumpkin shell lasts longest in cool, dry autumn weather when kept out of rain and standing water, and breaks down much faster during warm Indian-summer spells, humid nights, freeze-thaw cycles, or if water stays trapped inside the cavity (Garden Gate Magazine; Thrive).
Inspect your pumpkin planter every few days (especially when you lift the mum pot out to water) for these visible warning signs that the shell is breaking down:
- Softening or spongy base: Pressing gently near the bottom edge feels mushy or yields under your thumb.
- Sagging or inward-folding walls: The cut top rim slumps inward or the pumpkin loses its round profile.
- Weeping or leaking liquid: Dark moisture or sticky residue appears on the saucer, mat, or porch surface underneath.
- Sour or unpleasant odor: A fermented smell when you lift out the nursery pot.
- Visible mold or decay: Fuzzy white, gray, or dark mold spreading along the cut rim or inner cavity.
9. What to Do When the Pumpkin Breaks Down
Because your mum remained in its own nursery pot, retiring a softening pumpkin takes less than two minutes and does not disturb a single root:
- Lift out the intact nursery pot: Remove the mum pot, rinse or wipe off any pumpkin residue on the bottom of the plastic container, and slip it into a fresh pumpkin shell or a standard decorative patio planter for the rest of its bloom cycle.
- Transitioning the mum to a container or garden bed: Fall florist/decorative mums and garden mums are enjoyable first as seasonal autumn color. As University of Illinois Extension notes, mums planted late in autumn after sitting on a porch often struggle to establish deep enough roots before winter freeze in colder northern climates (though hardy garden chrysanthemum cultivars planted early in well-drained garden soil in milder zones or mulched well have a better chance of returning). Enjoy the blooms on your porch, or transplant hardy garden types where local climate and timing allow.
- Compost the untreated pumpkin shell: Because you did not coat the pumpkin with bleach, petroleum jelly, paint, or synthetic sealers, you can chop the spent pumpkin shell and add it directly to your backyard compost pile or municipal yard-waste bin (remove any seeds first if you do not want volunteer pumpkin seedlings next spring).
10. Alternative Method: Direct Planting
Some gardeners and craft guides (Thrive; Garden Gate Magazine; The Home Depot) describe an alternative approach: planting directly into a hollowed pumpkin filled with potting mix.
Do not mix the steps of the two methods: If you choose direct planting instead of the removable nursery-pot method, you must pierce or drill several drainage holes through the bottom of the pumpkin shell first before adding moist potting mix and unpotting the plant. Because damp potting soil stays in constant direct contact with the cut interior pumpkin flesh, a directly planted pumpkin shell typically softens faster than a dry shell holding a removable nursery pot, and requires unpotting or cutting away the decomposing pumpkin when the display ends.
| Comparison Point | Removable nursery pot inside pumpkin (Recommended) | Direct planting into a drained pumpkin |
|---|---|---|
| Setup | Hollow the pumpkin and slip the mum inside while keeping its plastic nursery pot intact. | Hollow the pumpkin, pierce bottom drainage holes through the rind, fill with potting mix, and unpot the plant into the shell. |
| Drainage method | Uses the nursery pot’s existing bottom holes; water drains outside the pumpkin before the pot is returned. | Relies on holes pierced through the bottom of the pumpkin floor (elevated slightly on feet or a saucer so holes do not seal). |
| Watering | Lift the nursery pot out, water the soil, let drain 10–15 minutes, and return to a dry pumpkin cavity. | Water in place; excess water percolates through the potting mix and exits the bottom of the pumpkin shell. |
| Maintenance | Interior pumpkin walls stay much drier; easy to wipe out condensation or swap into a fresh pumpkin anytime. | Wet soil sits continuously against cut pumpkin flesh, accelerating shell softening and soil-stained runoff underneath. |
| Cleanup | Clean and fast: lift the intact nursery pot out in seconds and compost the untreated pumpkin shell. | Messier: requires digging the root ball out of softening pumpkin flesh or planting/composting the decaying shell and soil together. |
| Best use | Single potted porch mums where you want the cleanest care, longest shell life, and effortless plant rescue. | Short-term mixed autumn arrangements or small violas/succulents where multiple root balls must share one cavity. |
11. Common Mistakes to Avoid
Avoiding these eight frequent missteps keeps your mum blooming and prevents premature porch messes:
- Cutting the top opening too small: Guessing the hole size without measuring the nursery pot first leads to an opening that either won’t accept the pot or wedges it so tightly you cannot lift it out to water.
- Damaging brittle mum stems while forcing the pot: Pushing down on the mound of stems or scraping outer branches against a narrow pumpkin rim snaps flower-bearing shoots—always handle the plastic nursery pot by its rim.
- Leaving standing water trapped inside the pumpkin: Watering the mum while it sits inside an undrained pumpkin floods the root zone and turns the pumpkin floor mushy within days.
- Watering over the flowers instead of at the soil line: Pouring water over top of a dense mum canopy wets the petals (promoting brown spotting) while shedding water off the sides so the root ball stays dry inside.
- Keeping the mum in deep shade: Hiding the planter in a dark corner to keep the pumpkin cool deprives chrysanthemums of the bright light (6+ hours daily) needed to open tight buds.
- Overheating the pumpkin in hot afternoon sun or near indoor heat vents: Setting a cut pumpkin on heat-radiating dark stone in hot afternoon sun—or near an indoor radiator—accelerates flesh breakdown and dries the mum’s small pot rapidly.
- Ignoring a softening or leaking pumpkin shell: Waiting until the bottom collapses can stain porous porch wood, concrete, or stone; always use a protective saucer or mat and check the base every few days.
- Assuming the display lasts indefinitely: Both a cut real pumpkin and a fall potted mum in bloom are seasonal; inspect regularly and move the mum pot when the shell begins to soften.
Printable Guide: Pumpkin Planter DIY & Care Checklist (PDF)
Download our 1-page printable worksheet with the supplies and pumpkin-to-pot fit checklist, safe adult preparation steps, the lift-out watering and 10–15 minute drainage rule, the removable-pot vs. direct-planting comparison table, shell breakdown warning signs, and a write-in Pumpkin Planter Care Tracker. Free direct download—no email signup required.
12. Frequently Asked Questions
Can I plant mums directly into a pumpkin?
Yes, you can plant directly into a pumpkin if you first pierce or drill several drainage holes through the bottom of the pumpkin and fill it with potting mix (Thrive; Garden Gate). However, keeping the mum in its removable plastic nursery pot inside the hollow pumpkin is usually cleaner and easier: wet potting mix sitting directly against cut pumpkin flesh speeds up shell rot and makes rescuing the mum messier when the pumpkin breaks down.
Do pumpkin planters need drainage holes?
Your chrysanthemum always needs working drainage. If you keep the mum in its plastic nursery pot and lift it out of the pumpkin to water and drain for 10 to 15 minutes before returning it, you do not need to cut holes in the bottom of the pumpkin. If you water the plant in place or plant directly into soil inside the pumpkin, you must cut bottom drainage holes through the pumpkin floor—a layer of gravel at the bottom of an unpierced pumpkin does not create drainage.
Can I keep the mum in its nursery pot?
Yes—and for most home decorators, keeping the mum in its original draining nursery pot is the best method (Costa Farms; Garden Gate). The pumpkin acts as a decorative outer cachepot, the mum's roots are never disturbed, watering and draining happen outside the pumpkin, and you can lift the intact pot out in seconds when the pumpkin shell eventually softens.
How do I water a pumpkin planter?
Check the mum's soil every day or two by pressing your finger 1 inch into the potting mix. When it feels dry, lift the plastic nursery pot out of the pumpkin, water slowly at the base of the stems (not over the flowers) until water runs out of the bottom drainage holes, let the pot finish dripping for 10 to 15 minutes, check that the inside of the pumpkin is dry, and set the nursery pot back inside.
How long will the pumpkin last?
There is no fixed number of days a cut pumpkin will last because shelf life depends heavily on outdoor temperature, humidity, sun exposure, rain, and whether water gets trapped inside. In cool, dry autumn weather with lift-out watering, a firm pumpkin may hold up for a week to a couple of weeks or more; in warm, wet, or humid weather—or after a freeze-thaw cycle—it can soften in just a few days. Inspect the base regularly and replace the shell as soon as you see soft spots, sagging walls, leaking liquid, or mold.
Can I use a pumpkin planter indoors?
Only briefly, such as for a weekend dinner or party centerpiece, and always with a waterproof tray or saucer underneath. Indoors, warm room air speeds up pumpkin softening and odor, and indoor tables do not provide the 6+ hours of bright sunlight that garden mums need to keep opening buds.
Can I save my mum after the pumpkin rots?
Yes. If you kept the mum in its removable nursery pot, simply lift the plastic pot out of the softening pumpkin, wipe off the bottom of the pot, and place it into a regular patio container or fresh pumpkin shell, or transplant it if your local climate and season still allow root establishment. Compost the untreated pumpkin shell.
Will the mum survive winter?
That depends on whether your plant is a florist mum or a cold-hardy garden mum, your USDA hardiness zone, and when it goes into the ground. University of Illinois Extension notes that fall mums left in small porch pots through October or November rarely establish deep enough roots to survive northern winters if planted late in the season. In milder climates—or when hardy garden mums are planted early into well-drained soil and mulched—they have a better chance of returning in spring.
Authoritative Sources & References
In accordance with PlantoGrove’s editorial standards, we distinguish below between land-grant university Extension publications (used for chrysanthemum light, moisture, drainage, and overwintering biology) and gardening charity, grower, and DIY horticultural publications (used for decorative pumpkin planter assembly and shell care):
- University of Illinois Extension (Institutional Extension Reference) — Making the Most of Fall Mums
- Mississippi State University Extension (Institutional Extension Reference) — Use Mums to Keep Fall Landscapes Bright
- Thrive (UK Gardening for Health Charity — Practical Activity Guide) — How to make a pumpkin planter
- Costa Farms (Commercial Grower Care Guide) — Chrysanthemums Add Fall Style
- Garden Gate Magazine (Container Gardening Project Guide) — How to Make a Fall Pumpkin Planter
- The Home Depot (Retailer DIY Project Guide) — DIY Pumpkin Planter (Editorial transparency note: direct automated fetch to homedepot.com returned HTTP 403 due to Akamai bot protection during verification; all chrysanthemum care and pumpkin drainage steps in this guide rely on the verified University of Illinois Extension, Mississippi State University Extension, Thrive, Costa Farms, and Garden Gate publications above.)