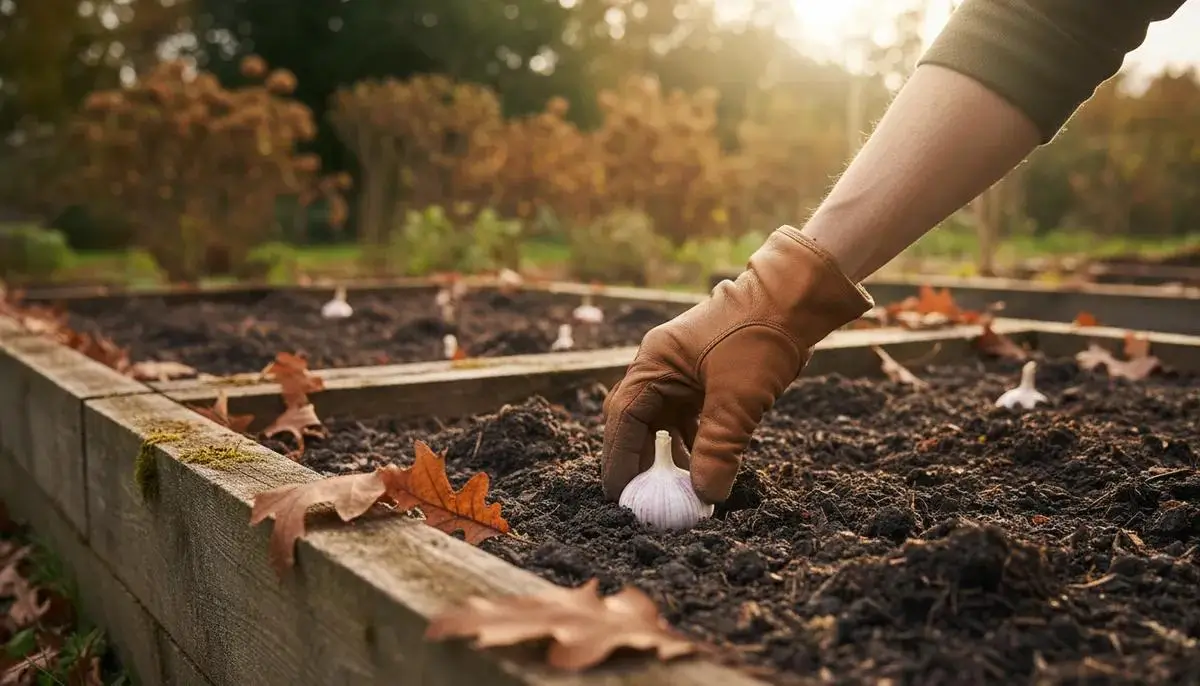
The immediate answer: how the fall-to-summer garlic timeline works
Garlic planted in fall usually establishes roots before winter, produces strong foliage in spring, develops bulbs as temperatures and daylight increase, and is harvested the following summer. In many temperate US gardens—from New England and the Upper Midwest to the Mid-Atlantic—cloves planted in October or November are harvested in June or July, spending approximately 8 to 9 months in the ground (University of Minnesota Extension; University of Maryland Extension).
Because garlic rests through winter and triggers bulb division in response to winter chill (vernalization) and lengthening spring daylight (photoperiod), no single day count applies everywhere. Never rely on a rigid “180 to 210 days” rule for fall-planted garlic: actual time from planting to harvest shifts with your winter length, cultivar, and spring warmth. Always confirm readiness by watching lower-leaf browning and inspecting a test bulb (Rutgers Cooperative Extension FS1233; UConn Extension).
At-a-glance seasonal garlic calendar: fall planting to summer curing
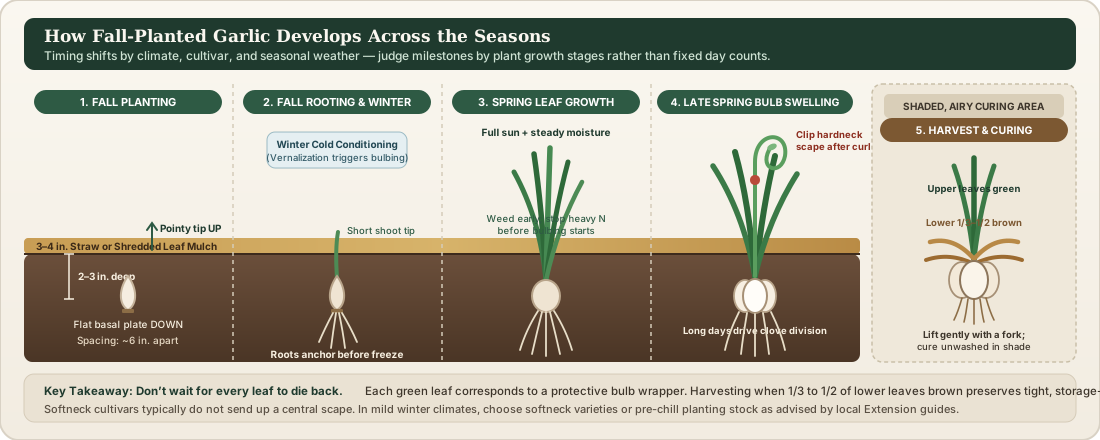
Use these five seasonal growth stages to anchor your garden calendar to local frost and plant cues rather than fixed dates:
| Seasonal Stage | What the Plant Is Doing | Key Gardener Action |
|---|---|---|
| 1. Fall Planting (Mid-Autumn) | Dormant seed cloves are separated and set into cool, unfrozen soil after summer heat fades. | Break bulbs 24–48 hours before planting; plant largest outer cloves pointed end up, flat basal plate down, ~2–3 in. deep and ~6 in. apart. |
| 2. Fall Rooting & Winter Dormancy | Dense roots grow from the basal plate before the ground freezes; winter cold fulfills vernalization. | Apply 3–4 in. of clean straw or shredded leaf mulch to buffer freeze-thaw heaving and suppress winter weeds. |
| 3. Spring Leaf Canopy Growth | Green leaves expand rapidly; each healthy leaf builds one protective wrapper layer around the future bulb. | Keep beds thoroughly weeded, supply ~1 in. of water per week, and finish any spring nitrogen feeding before bulbing begins. |
| 4. Late Spring Scape & Bulb Swelling | Lengthening daylight and warming soil trigger clove division; hardneck types send up a curling flower stalk (scape). | Snap or cut curling hardneck scapes just above the highest leaf so energy goes into the bulb; avoid late nitrogen fertilizer. |
| 5. Summer Harvest & Curing | Cloves fill out their papery skins; lower leaves brown from the bottom up as outer wrappers dry. | Stop watering 1–2 weeks prior; dig when lower 1/3 to 1/2 of leaves brown while upper leaves stay green; lift with a fork and cure in shade. |
Choosing seed garlic: hardneck vs. softneck and why clove selection matters
Every garlic clove you put in the ground is an asexual clone of its parent bulb. Starting with certified or locally adapted seed garlic from a reputable nursery, seed catalog, or local grower gives you varieties suited to your winter climate and screened for destructive soil-borne pests like white rot, Fusarium basal rot, and stem and bulb nematodes (UMN Extension; UConn Extension). Avoid planting supermarket garlic: grocery bulbs are frequently mild-winter softneck varieties poorly adapted to cold northern gardens, may carry latent diseases into your beds, or may have been cold-stored or treated to inhibit sprouting.
| Feature | Hardneck Garlic (Allium sativum var. ophioscorodon) | Softneck Garlic (Allium sativum var. sativum) |
|---|---|---|
| Winter hardiness & climate fit | Most cold-hardy; reliable winter chill helps trigger proper clove division in northern and cold-winter gardens. | Requires less winter chill; performs best in mild-winter southern and coastal regions (or well-mulched moderate zones). |
| Clove arrangement | Single ring of 4 to 12 larger, uniform cloves surrounding a stiff central woody stem; easier to peel. | Multiple overlapping tiers of 10 to 20+ cloves (larger outer cloves, smaller inner cloves) with no woody center stem. |
| Flower stalk (scape) | Produces a curling edible scape in late spring or early summer that gardeners clip so bulb size is not reduced. | Normally does not produce a scape (unless stressed by unusual weather swings). |
| Braiding & storage life | Stiff neck cannot be braided; typically stores for roughly 3 to 6 months when cured well. | Pliable dried leaves braid easily; tight wrappers often store for 6 to 9+ months in cool, dry conditions. |
Wait until planting week to pop bulbs apart: Keep seed heads whole until 24 to 48 hours before planting so the root initials on the basal plate do not dry out or bruise. Plant the largest, firmest outer cloves with their papery wrappers intact, and save tiny inner cloves for the kitchen—large cloves consistently produce larger harvested bulbs (Rutgers Extension FS1233; UConn Extension).
Fall planting: timing, clove orientation, depth, and spacing
The goal of fall planting is to give cloves enough cool autumn weeks to grow a strong root system before the ground freezes solid, without planting in late-summer heat that pushes tall, frost-tender leaf growth (UMD Extension):
- Local planting window: In cold northern states such as Minnesota, UMN Extension recommends planting within 1 to 2 weeks after the first killing frost (typically mid-October). Across New England and the Mid-Atlantic, UConn Extension, Rutgers Extension, and UMD Extension advise planting in October through November—about 3 to 6 weeks before the ground freezes hard. In milder southern regions like Georgia, planting continues from mid-autumn into November or early December (UGA Extension Circular 854).
- Correct clove orientation: Set every clove with the flat basal root plate facing down and the pointed tip facing up. Planting cloves upside down forces both the emerging shoot and roots to curve around the clove, which drains stored energy and can reduce bulb size or deform necks.
- Depth and spacing (~2–3 inches deep, ~6 inches apart): A practical starting point for most home beds is setting cloves about 2 to 3 inches deep and 6 inches apart (or 4 to 6 inches apart within rows spaced 12 to 18 inches apart). Why do you occasionally see 1 to 4 inches across Extension sheets? Depth recommendations vary slightly by winter severity, soil texture, and whether a guide measures from the base of the clove (often 2–3 inches total furrow depth) or soil coverage above the pointed tip (typically 1–2 inches of soil over the tip in milder climates like Georgia, or 2 inches over the tip in colder northern beds).
As an Amazon Associate I earn from qualifying purchases.
Fiskars Ergo Garden Trowel (Model 384220-1001)
Helpful for fall planting: A narrow cast-aluminum blade with depth gradations makes it easy to open individual 2 to 3 inch planting holes along a mulched row without disturbing the rest of the bed.
Already own a sturdy hand trowel or dibber? Use what you have—no hand tool increases bulb yield. At summer harvest, switch to a garden digging fork rather than a hand trowel so you do not slice mature bulbs.
Fall roots, winter mulch, and what if green shoots appear before winter?
Garlic thrives in loose, fertile, well-drained loam with a pH around 6.0 to 7.0. In heavy clay or low-lying spots where winter rain or snowmelt pools, plant in raised beds amended with finished compost so cloves never sit in waterlogged, freezing mud (UGA Extension).
Immediately after planting and watering in, cover the bed with 3 to 4 inches of clean, weed-free straw or shredded leaves (UMD Extension; UMN Extension). Winter mulch moderates repeated freeze-thaw cycles that can heave shallow cloves onto the soil surface, conserves spring moisture, and blocks winter annual weeds. Do not panic if modest green shoots poke 1 to 3 inches above the soil during a mild late autumn: low green tips insulated by straw mulch commonly survive winter intact and resume rapid growth in spring, though slightly browned leaf tips may appear after deep freezes.
Spring leaf growth, bulb formation, and hardneck scape removal
As days warm in March and April, green shoots push rapidly through the mulch. Every healthy green leaf the plant produces in spring forms one papery wrapper layer around the bulb and manufactures the carbohydrates that will swell the cloves later (Rutgers Extension FS1233):
- Full sun and early weeding: Garlic has narrow, upright leaves that cast almost no shade and a shallow root zone that loses out quickly to weeds. Hand-weed early and keep straw mulch in place so roots are not disturbed by deep hoeing.
- Consistent spring moisture: Supply roughly 1 inch of water per week (from rainfall or irrigation) while leaves and bulbs are actively expanding. Drought stress in spring stunts bulb size.
- Early-spring nitrogen—and knowing when to stop: Garlic is a moderate-to-heavy feeder during early spring leaf expansion. If soil tests or bed history show a need for supplemental nitrogen, side-dress in early spring as shoots resume growth and again in mid-spring—stopping all nitrogen applications by late April or early May once bulbing starts (Rutgers Extension; UConn Extension). Heavy late nitrogen pushes soft leafy tops instead of firm bulbs.
- How cold + long days trigger bulbing: Garlic does not form segmented cloves simply because it reaches a certain age. After winter cold satisfies its chilling requirement, lengthening late-spring daylight (photoperiod) combined with warming temperatures signals the plant to stop making new leaves and partition energy into lateral axillary buds that swell into individual cloves (UGA Extension).
- Hardneck scapes: In late spring or early summer, hardneck cultivars send up a smooth, round central flower stalk called a scape that loops into one or two curls. Snap or clip the scape just above the top leaf while it is tender and curled so the plant directs energy into the underground bulb rather than aerial bulbils—and enjoy the garlicky scapes in stir-fries or pesto (UMN Extension). Remember that softneck varieties normally do not produce a scape.
Harvest readiness: reading lower leaves and digging a test bulb
Harvest timing is the most common point where home gardeners lose storage quality. Because each green leaf above ground wraps all the way down around the bulb as a papery skin, do not wait until every leaf turns brown and flops over (UMN Extension; UConn Extension):
- Watch the lower leaves: Begin checking daily in early-to-mid summer when roughly the lower one-third to one-half of the leaves have turned yellow or brown, while the upper half to two-thirds (about 4 to 6 upper leaves) remain green.
- Stop watering 1 to 2 weeks before harvest: Holding off irrigation as lower leaves brown helps outer wrappers dry cleanly and reduces bulb staining and fungal rot (UMD Extension).
- Dig a test bulb before lifting the whole bed: Carefully lift one or two bulbs and feel or slice the outer wrapper. Ready bulbs have plump, well-defined cloves that fill out the skin with snug, intact papery wrappers. Digging too early yields small, poorly divided bulbs with thick wet skins; digging too late leaves split wrappers and exposed cloves that invite mold and store poorly.
Lifting, curing, trimming, and long-term storage
Once your test bulb confirms readiness, harvest on a dry morning and handle bulbs gently so they do not bruise or sunscald (UMD Extension; Rutgers Extension FS1233):
- Loosen and lift—never yank stems: Push a garden digging fork into the soil several inches outside the row, loosen the root zone from below, and lift the plants out intact. Pulling garlic by the stalk out of firm soil rips the stem at the neck and ruins storage life.
- Keep out of direct sun and never wash with water: Move harvested plants into the shade right away—hot summer sun can bake freshly dug bulbs within hours. Gently brush off loose dry soil with your fingers, leave both the roots and green/brown tops attached, and never rinse bulbs with water before curing.
- Cure in a shaded, dry, well-ventilated spot: Hang plants in small airy bundles of 5 to 10 or lay them in a single layer on slotted tables or screens in a covered porch, shed, or garage with good airflow. Depending on local humidity, bulb size, and airflow, curing takes roughly 7 to 14 days in warm, dry conditions (UMD Extension) or 2 to 4+ weeks (up to 3 to 6 weeks in humid summers per UMN and Rutgers Extension). Garlic is fully cured when the roots feel like stiff brush bristles, outer wrappers are dry and papery, and the center stem is dry all the way to the core when cut.
- Trim and store at cool room conditions: After curing, trim roots to 1/4 to 1/2 inch (so they do not tangle) and cut stems 1 to 2 inches above the bulb (or braid softneck tops), brushing away the outermost dirty wrapper layer while leaving the clean inner papery skins intact. Store in mesh bags, open baskets, or paper bags in a cool, dark, dry, well-ventilated room (ideally around 55–60°F with moderate 50–60% humidity). Do not store eating garlic in a standard kitchen refrigerator (~35–40°F and humid), which mimics winter chill and causes cloves to sprout and turn bitter.
Troubleshooting common garlic timeline problems
| What You See | Likely Cause | How to Fix or Prevent Next Season |
|---|---|---|
| Small bulbs or single undivided “rounds” | Insufficient winter cold exposure (vernalization), spring planting, planting tiny inner cloves, or heavy weed competition in spring. | Plant adapted cultivars in fall using large outer cloves; keep beds weeded; use edible rounds in cooking or replant them in fall. |
| Split outer wrappers & splayed cloves at harvest | Harvested too late after nearly all green leaves browned and outer wrapper layers decayed in damp soil. | Use split bulbs first in the kitchen (they will not store long); next summer, dig when 1/3 to 1/2 of lower leaves brown. |
| Soft, mushy necks or yellowing/rotting base | Poorly drained/waterlogged winter soil, watering right up to harvest day, or curing in a damp, stagnant room. | Plant in raised, well-drained beds, stop watering 1–2 weeks before digging, and cure with moving air in shade. |
| Thick necks & lush leaves but small bulbs | Excess nitrogen fertilizer applied too late in spring after lengthening days began bulb formation. | Apply nitrogen only in early spring during leaf growth and stop before late-spring bulb swelling begins. |
| Spring-planted garlic stays small | Cloves planted in spring miss autumn root establishment and full winter chill before long summer days arrive. | Switch to fall planting so roots establish before winter freeze and plants build a full spring leaf canopy before bulbing. |
5-stage garlic decision checklist: planting to harvest
-
01
Pre-Planting Clove & Cultivar Check: Is the garlic cultivar adapted to my climate, and are the seed cloves firm, large outer cloves with intact papery wrappers separated right before planting?
-
02
Fall Soil & Planting Window Check: Has summer soil heat passed (or first frost arrived) while the ground is still unfrozen and well-drained, and are cloves set pointed-end up under 3–4 inches of mulch?
-
03
Spring Canopy & Scape Check: Does the plant have weed-free soil, ~1 inch of weekly moisture, early nitrogen finished before bulbing, and (on hardnecks) curling scapes clipped in late spring?
-
04
Early-Summer Lower-Leaf Check: Have roughly the lower one-third to one-half of the leaves turned yellow or brown while the upper leaves remain green, with watering stopped 1–2 weeks prior?
-
05
Test-Bulb & Wrapper Check: Did a dug test bulb confirm plump, filled-out cloves and intact papery wrappers before lifting the bed gently with a garden fork to cure in dry shade?
Garlic Planting-to-Harvest Calendar & Checklist
Includes the 5-stage seasonal checklist with blank local date fields, planting depth and spacing reference, hardneck vs. softneck comparison, harvest-readiness and curing checklists, and write-in garden bed record lines. Free direct download with zero affiliate links inside the PDF.
Frequently asked questions
How many months does fall-planted garlic take from planting to harvest?
In many temperate US gardens, fall-planted garlic takes approximately 8 to 9 months from autumn planting (often October or November) to summer harvest (often June or July). Exact timing varies with your climate, winter temperatures, cultivar, and spring weather rather than a fixed day count.
Which way do you plant garlic cloves—pointed end up or down?
Always plant garlic cloves with the pointed end facing UP and the flat, rough basal plate facing DOWN. Roots grow from the flat basal plate and the green shoot emerges from the pointed tip.
Should I remove the papery skin from garlic cloves before planting?
No. Keep the papery wrapper on each individual clove intact when separating the bulb just before planting. The wrapper helps protect the clove in cool autumn soil.
How do I know when my garlic is ready to harvest without digging too early or too late?
Start checking when the lower one-third to one-half of the leaves have turned brown while 4 to 6 upper leaves remain green. Because leaf browning can vary with weather and cultivar, gently lift one or two test bulbs with a garden fork to verify that cloves are plump and well-formed while outer wrappers are still snug and intact.
Why shouldn’t I store cured garlic in the refrigerator?
Refrigerator temperatures (around 38–40°F) mimic winter chilling (vernalization) and stimulate dormant cloves to sprout, turning them bitter and shortening storage life. Store cured garlic in a cool (55–60°F), dark, dry, well-ventilated room in mesh bags or open baskets.
Sources & Extension references
- University of Minnesota Extension — Growing garlic in home gardens
- University of Maryland Extension — Growing Garlic in a Home Garden
- Rutgers Cooperative Extension — Growing Garlic in the Home Garden (FS1233)
- University of Georgia Cooperative Extension — Garlic Production for the Gardener (Circular 854)
- UConn Extension — Garlic Cultivation in Connecticut